Rosi is an easy way to run your C# code everywhere, especially on Linux and macOS. No need to mess around with package management.
Rosi is just a single executable file that you need to run your C# code. Just put it on your USB drive and you're done.
Rosi is a lightweight tool designed to simplify running C# code across platforms, especially on Linux and macOS.
Key Features:
Cross-platform compatibility for seamless execution of C# applications.
Single executable file for easy deployment and portability (can be run from a USB drive).
Built-in support for .NET Core, eliminating the need for complex package management.
Installable via winget for quick setup on Windows systems.
Audience & Benefit:
Ideal for .NET developers seeking an efficient way to run C# code without platform-specific setup or configuration. Rosi streamlines development workflows by providing a portable and reliable solution for executing C# applications across Linux, macOS, and Windows.
README
Rosi 6
The power of .NET Core in a single executable
Rosi is an easy way to run your C# code everywhere, especially on Linux and macOS. No need to mess around with package management. Rosi is just a single executable file that you need to run your C# code. Just put it on your USB drive and you're done.
You only have to modify your code to impelement the IRosi or IAsyncRosi and you're done.
#!/usr/local/bin/rosi
using System;

public class Rosi : IRosi
{
    public int Run(IRuntime runtime)
    {
        Console.WriteLine("Hello World");
        return 0;
    }
}
> Side note: We use SaltStack to manage our servers and the servers from our customers. It is a great and simple way to automate the management of our infrastructure. And therefore we have some rules, two of them are: We don't configure anything by hand, everything is done by using salt and we don't touch the package management of a system and add any external sources, if it's not really required. Using salt only is often not enough, we have to write scripts here and there to glue everything together. And we used Bash scripts. But while you can writing complex scripts in bash, you usually don't want to do that.
Download the latest Rosi macOS App, unzip it and move it to the Applications folder. All .rosifiles will open in the macOS App, when you double click them. To make Rosi available through the terminal, put a symlink into /usr/local/bin.
Download the latest Rosi Windows Installer and run it. It installs Rosi into C:\Windows\Rosi, adds this path to the PATH environment variable and associates the .rosi file extension with the rosi.exe.
Manual
Download the latest Rosi Windows Version and unzip it.
You will have the rosi.exe in the current directory. Move the rosi.exe to a location of your choice and add to your PATH environment variable to access it from the command line.
A more simple solution would be to move the rosi.exe into your Windows directory. Move it to C:\Windows and you're done. You can use it from the command line now.
Associate the .rosi file extension with Rosi. Look at this tutorial and select the rosi.exe in the last step.
> Side note: We use Rosi on desktop computers for automation to help the users get their stuff done faster (generate reports, process Excel sheets, etc). We usually put all the script files into a readonly network share and the users just have to double click on the correct .rosi file. No need to build and deploy binary files to individual computers (what a nightmare), it is 100% independent from the users operating system and we still get the native speed of the .NET Core framework. We only replace the script files on the network share and we're done.
Running
Command Line
(Linux/macOS/Windows) You can run Rosi scripts from the command line.
helloworld.rosi
public class HelloWorld : IRosi
{
    public int Run(IRuntime runtime)
    {
        Console.WriteLine("Hello World!");
        return 0;
    }
}
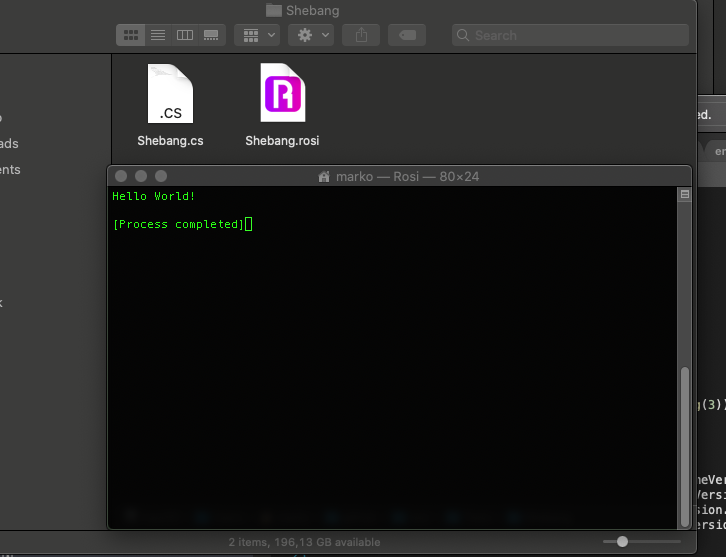
> rosi helloworld.rosi
Hello World!
Shebang
(Linux/macOS)Rosi scripts have shebang support. But a shebang is invalid C# code and would break debugging.
Therefore, we use a workaround for debugging scripts. We create two files, a script.rosi and a script.cs file.
The script script.rosi contains only the shebang and other directives and includes script.cs. See the Shebang Example.
script.rosi
#!/usr/local/bin/rosi
// include script.cs
script.cs
public class Shebang : IRosi
{
    public int Run(IRuntime runtime)
    {
        Console.WriteLine("Hello World!");
        return 0;
    }
}
Rosi scripts have the file extension .cs or .rosi and you can associate the .rosi file extension with Rosi.
Whenever a user double clicks on a .rosi file, the Rosi executes the script.
Do not confuse your users and name only your main script .rosi or change the script directory to a subfolder.
(Windows) You have to associate the file extension .rosi manually with Rosi. Look at this tutorial and select the rosi.exe in the last step.
(macOS) If you download the Rosi macOS App, all files with a .rosi extension will automatically open with it.
Debugging
Every Rosi script is a valid C# file.
And we didn't want to reinvent the wheel as there is already a huge eco system for C# avaiable.
Therefore, you can debug your Rosi script like a normal C# program with your favorite tools and IDEs. See the provided Debugging Project.
Basically, you create a new C# console project in your script directory, add the Rosi.Runtime NuGet package and set a valid Main method.
Create a new project in your script directory with your IDE of choice or use the console:
> cd YourScriptDirectory // change to your script directory
> dotnet new console // create a new console project
> dotnet add package Rosi.Runtime // add the Rosi.Runtime Nuget package
Now, two options are available.
A new project usually contains a Program.cs with a Main() method.
You can now edit this file or delete it and add the Main() method to your main script.
We usually prefer the second method.
You can now set your breakpoints and start debugging your script with your favorite IDE.
Here's an example of a script with a Main() method for debugging:
class Script : IRosi
{
    public int Run(IRuntime runtime)
    {
        System.Console.WriteLine("Hello World!");
        return 0;
    }

    static async System.Threading.Tasks.Task Main(string[] args)
    {
        return await new Rosi.Runtime(typeof(Script), args).RunAsync();
    }
}
Directives
// include
The include directive includes the content of the specified script file into the current script.
This is done by splitting the script into a header and body part and insert it at the right locations in the current script.
You can specify a wildcard to include all .rosi and .cs. Use include * to include all files in the current directory or
include ** to include all files in the current directory and all the subdirectories. You can also specify a directory to
include files, e.g. include Source/**.
class A
{
    readonly B _b;
    public A(B b)
    {
        _b = b;
    }

    public int Compiled()
    {
        _b.Test();
        return 0;
    }
}
// include A
class B : IRosi
{
    public void Test()
    {
        Console.WriteLine("Test");
    }
    public int Run(IRuntime runtime)
    {
        return new A(this).Compiled();
    }
}
// assembly
Loads an assembly into the Rosi.Runtime. Multiple assemblies can be loaded by separate every assembly by a comma.
// assembly Newtonsoft.Json.dll
using Newtonsoft.Json;
class Json : IRosi
{
    public int Run(IRuntime runtime)
    {
        Console.WriteLine(JsonConvert.SerializeObject(new TestObject()));
        return 0;
    }
}
// set
Sets internal or custom options. It is also possible to specify options via arguments.
A.cs
// set config.test Hello Config!
// set(linux) config.test Hello Config From Linux!
// set argument.test Will be overriden by the command argument
class A : IRosi
{
    public int Run(IRuntime runtime)
    {
        Console.WriteLine(runtime.Config.Get("config.test", string.Empty));
        Console.WriteLine(runtime.Config.Get("argument.test", string.Empty));
        return 0;
    }
}
Directives support os modifiers using the following format directive(windows|macos|linux) directivevalue. You can restrict directives to be executed only on certain os.
// set(linux|macos) mood Yay
// set(windows) mood Nay
Internal Options
Internal options for the Rosi.Runtime. You can set the options via the set directive or as a argument when running a script.
runtime.scriptpath
Sets a separate directory for the scripts, default is the location of the main script.
runtime.assemblypath
Sets one or multiple directories (comma separated list) for assemblies, default is the location of the main script.
runtime.usecachedassemblies
Compiled assemblies will be chached and resued every run, as long as they scripts don't change. Default is true.
runtime.logtoconsole
Log output will be redirected to the console, default is true.
runtime.consoleloglevel
The log level for the console output. Valid values: Trace, Debug, Info, Warning, Error or Fatal. Default is Info.
runtime.logtofile
Log output will be redirected to a file, default is false
runtime.fileloglevel
The log level for the console output. Valid values: Trace, Debug, Info, Warning, Error or Fatal. Default is Warning.
runtime.logfilename
The name or path of the log file, default is log.txt.
runtime.logfileappend
Appends the log output to the current log file, otherwise the log file will be overwritten every run. Default is true.
runtime.logscriptonerror
Show the actual script in the log ouput, if the compilation fails.
scriban.path
Sets a separate directory for scriban templates, default is the location of the main script.
rosi.waitforexit
You will have to press a key after the exection of the script. This is useful on Windows, as the console window closes after the execution of the script. Default is false.
Scriban Templates
Scriban is a fast and powerful templating engine.
If you don't know scriban, head over the GitHub Repository to learn more about it. It is easy to use and really awesome.
As linux admin, you probably know, that there are text based configuration files everywhere.
And as we often need to create configuration files, we embedded scriban into the Rosi.Runtime.
There is an example available: Scriban Exmaple.
Host.cs
using System.Net;

public class Host
{
    public string Name;
    public IPAddress Address;
}
Scriban.cs
// include Host
using System;
using System.Collections.Generic;
using System.Net;

public class Scriban : IRosi
{
    public int Run(IRuntime runtime)
    {
        var scriban = runtime.Scriban;

        scriban.ImportObject("Hosts", new List {
            new Host { Name = "host1", Address = IPAddress.Parse("10.0.0.1") },
            new Host { Name = "host2", Address = IPAddress.Parse("10.0.0.2") }
        });

        var result = scriban.Render("hosts", "testhostname");
        if (result.Valid)
        {
            Console.WriteLine(result.Output);
            return 0;
        }

        return 1;
    }
}
hosts.scriban
{{-

$hostname = $1

$valid = (object.size $hostname) > 0

setfilename "/etc/hosts"
setvalid $valid "Hostname is missing"

if !$valid
 ret
end

-}}
127.0.0.1 localhost
::1 localhost ip6-localhost ip6-loopback

127.0.1.1 {{ $hostname }}

# The following lines are desirable for IPv6 capable hosts
ff02::1 ip6-allnodes
ff02::2 ip6-allrouters

{{ for $host in Hosts -}}
{{ $host.Address }} {{ $host.Name }}
{{ end -}}
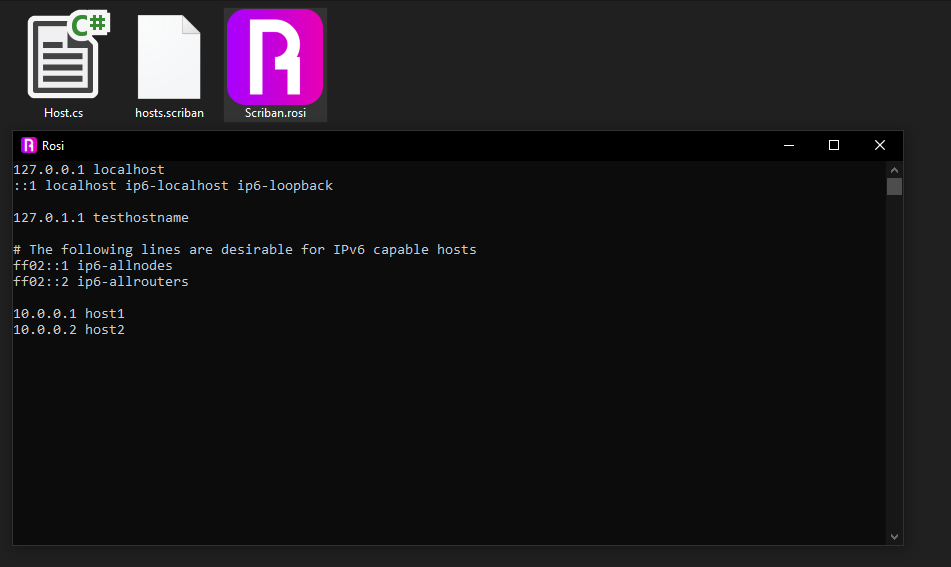
> rosi Scriban.cs
127.0.0.1 localhost
::1 localhost ip6-localhost ip6-loopback

127.0.1.1 testhostname

# The following lines are desirable for IPv6 capable hosts
ff02::1 ip6-allnodes
ff02::2 ip6-allrouters

10.0.0.1 host1
10.0.0.2 host2
In Memory of Rosi
A lovely wife, caring granda and best mom in the world.